It doesn’t matter how careful we are with our artwork, canvas paintings sometimes get damaged. Some of the most famous paintings in the world have sustained damage over the years and have needed to be repaired. However, what at first can seem like a complete disaster is in fact usually repairable, so let me show you how to preform a canvas painting repair and fix a damaged or ripped canvas painting.

NOTE: If your painting just has a dent in it, read how to get a dent out of a painting here.
The damage to the painting above happened when a friend, who was visiting my studio, accidentally knocked over a wooden print stand, the corner of which pierced this painting as it was on the floor leaning up against the wall. You can see the damage to the canvas was quite substantial, not only had the rip gone right through the painting, but the canvas had torn in two directions, both diagonally and horizontally.
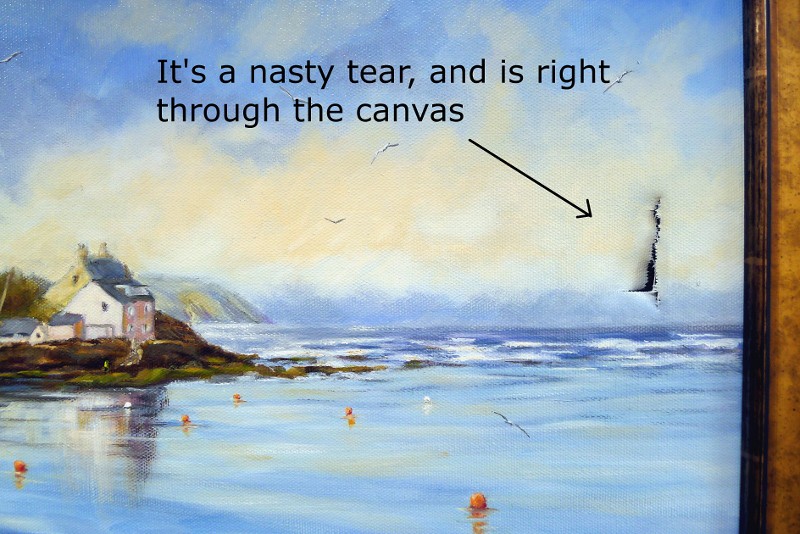
You can see here that the fibres of the canvas were pulled apart when the damage occurred, leaving a jagged uneven edge.
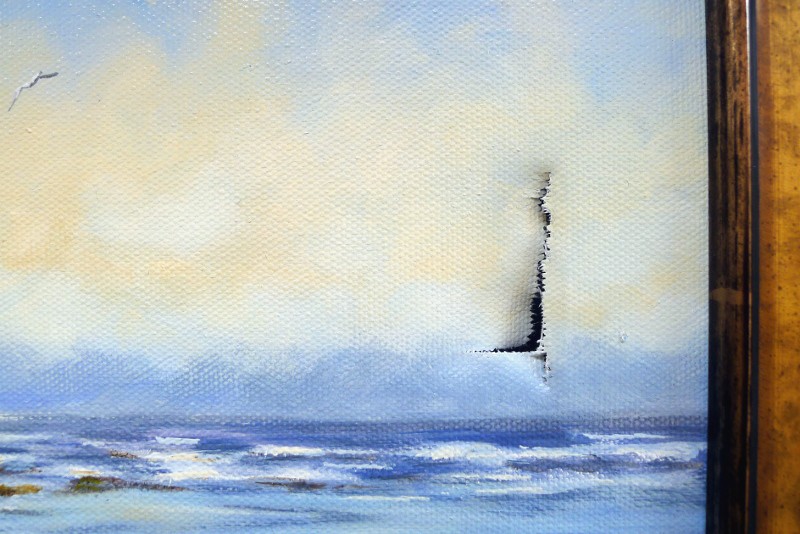
If this painting were a priceless Rembrandt I would align all of the individual fibres of the canvas and glue each one back together separately. However, this painting is priceless Chris Chalk, and as he (me) is still around to repaint the damaged area after the repair, I can make a simpler repair.
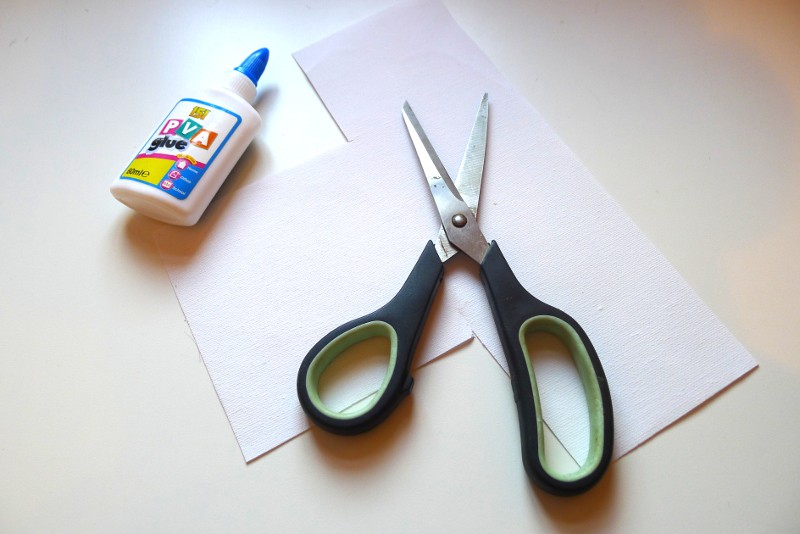
To repair a damaged or torn canvas painting you’ll need:
A pair of sharp scissors.
A piece of canvas the same ( or at least similar) to that of the original canvas.
Some acid free glue (in this case PVA – Polyvinyl acetate).
A flat piece of MDF or hardboard.
A weight, or something heavy to use as a weight.

First using your scissors to cut a piece of your spare canvas to make a patch. Make sure when you do this the patch is large enough to cover the damaged area of the painting, plus at least 3cm extra overlap, so that the patch can be glued to plenty of undamaged canvas around the tear. Once you’ve cut your patch to the correct size, apply PVA glue to one side of it.
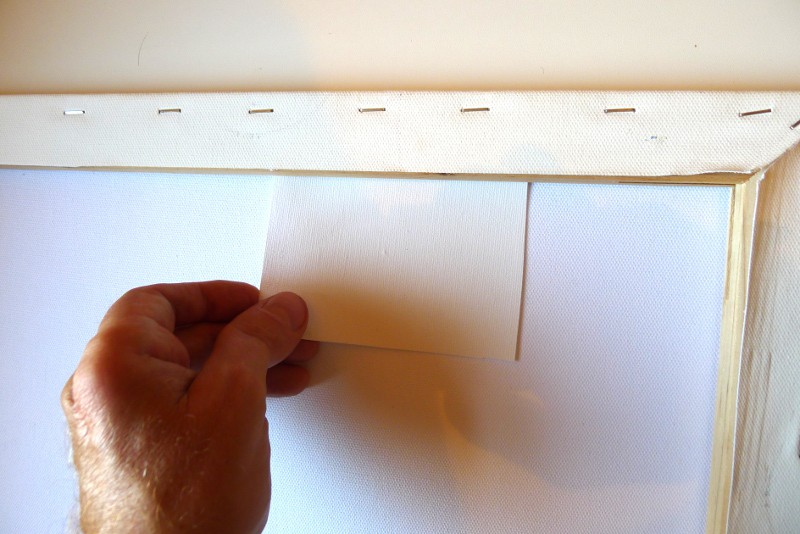
With the painting laying face-down on a clean flat hard surface, offer-up the canvas patch to the back of the painting and push it down into position. Make sure you’ve applied enough PVA glue so that every part of the patch is glued to the original canvas. If you have any excess PVC that get’s pushed out from under the patch just wipe it up with a wet cloth, PVA is water soluble and cleans-up easily.
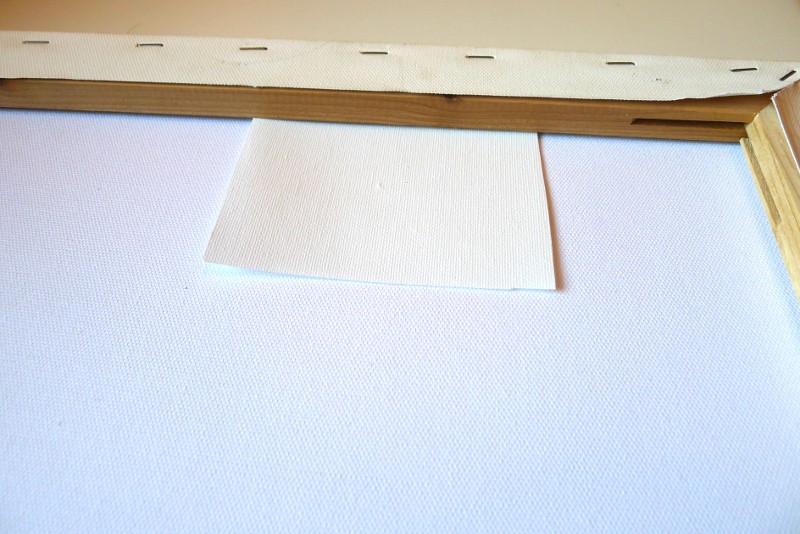
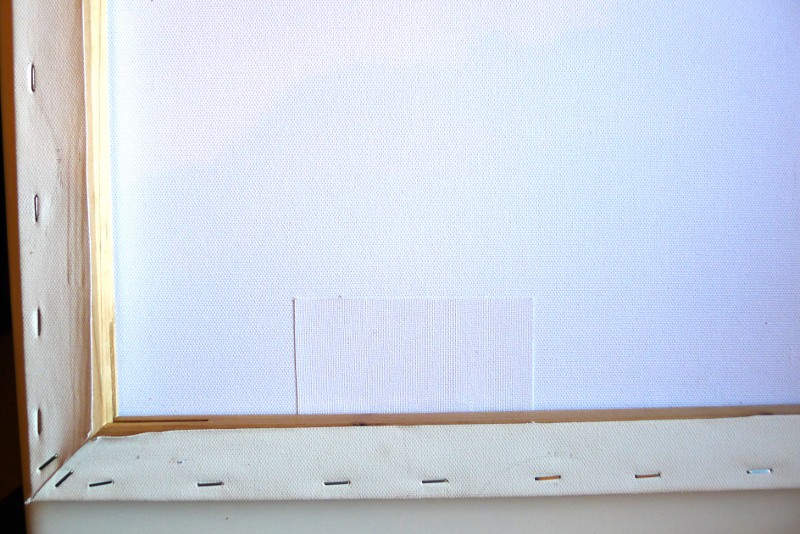
Make sure the new patch is in the correct position and that the damaged area of the canvas is under the middle of the new patch. You can see here, because the damage to my painting was near the edge of the painting, to achieve that I’ve had to push part of my new patch under the wooden stretcher-bar.
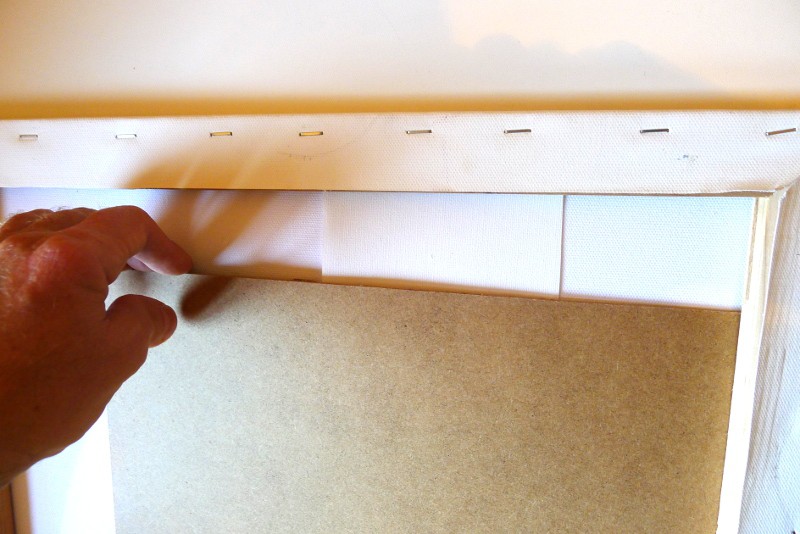
Once the patch is placed in the correct position we need to place another flat surface down onto the back of the patch so that as the glue dries it creates a perfectly flat repair. I’m using a thin sheet of hardboard to do this.
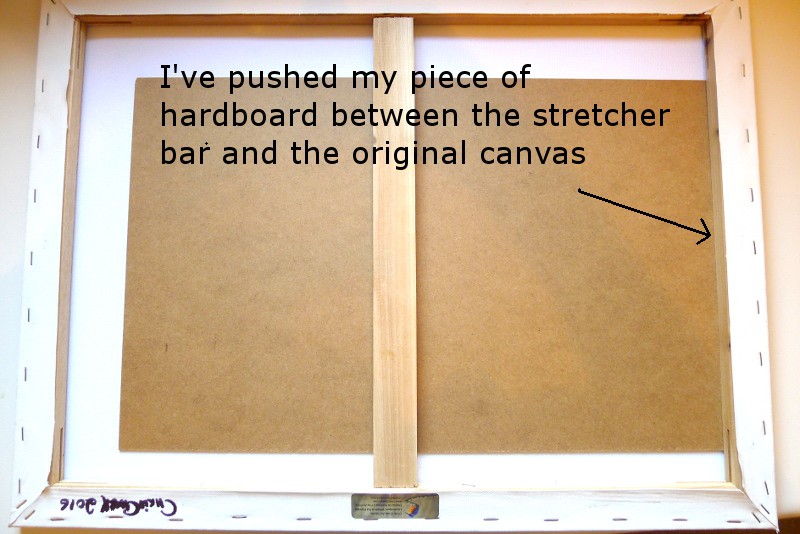
Again, because the damage in my case is very near the edge of the painting, I have had to push the thin sheet of hardboard I’m using between the original canvas and the wooden stretcher-bars, not just in the middle of the painting, but also on the right-hand edge.
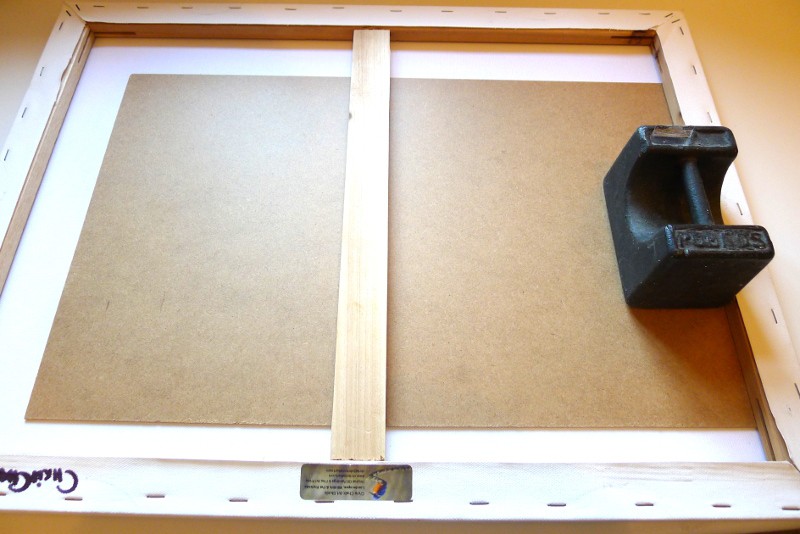
Once you’ve got you patch applied and your piece of board laying flat on top of it, you need to place a weight of some description on top of that to keep everything is position and to make sure a good bond is formed between the patch and the original canvas. Once you’ve done that you need to let the PVA dry for at least 24 hours before doing anything else.
Once the glue had dried and you’ve removed the piece of hardboard and the weight your repair should look something like this.
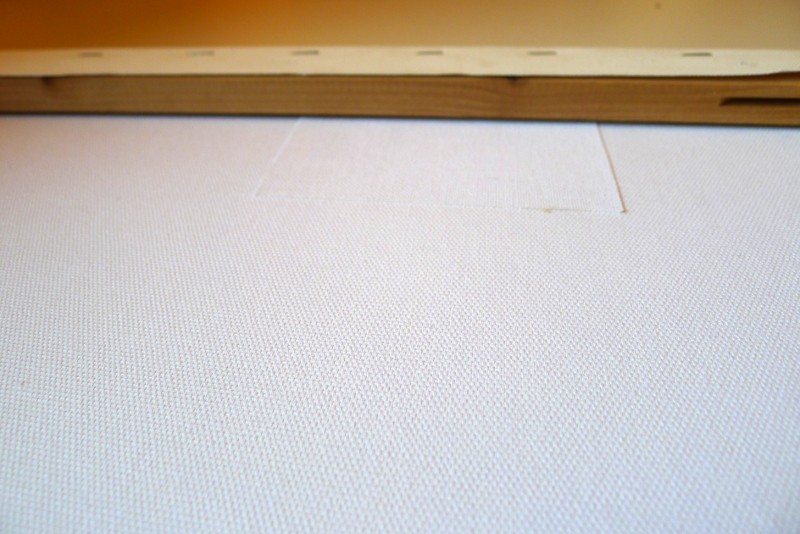
The new canvas patch should be glued to the original canvas right up to the edges. If it isn’t, and the edges of the patch can still be lifted up, you’ll need to work a little more PVA glue under the unglued edges with match stick (or something similar), replace the board and weight onto the back of the painting, and wait another 24 hours for that to dry.
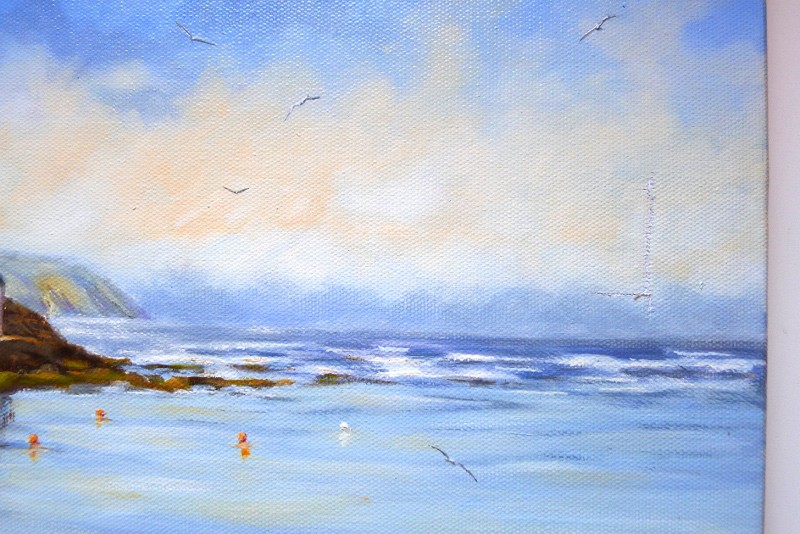
This is what the front of my painting looks like after the patch repair has been made to the rear.
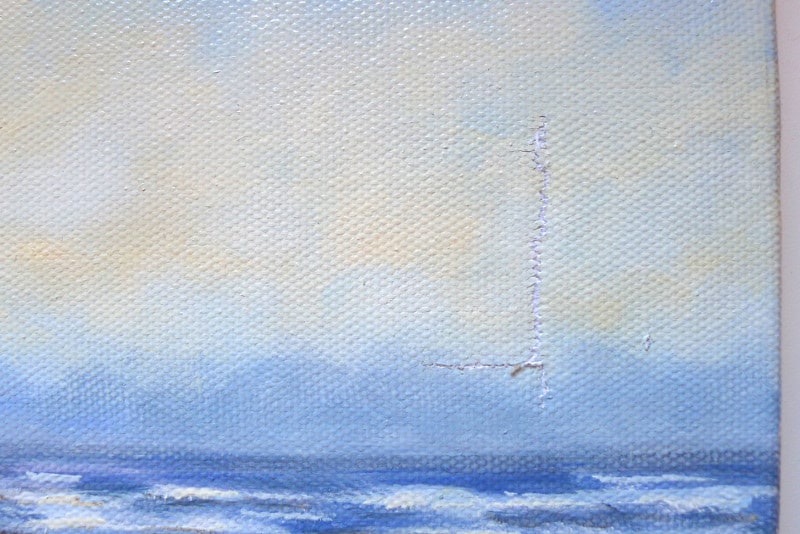
If you look closely you can see my repair was very successful. The canvas is even and flat once again, and all the edges are lined up well. You can however see that there are some stray/loose fibres, that’s not a problem, we’ll sort that out next.
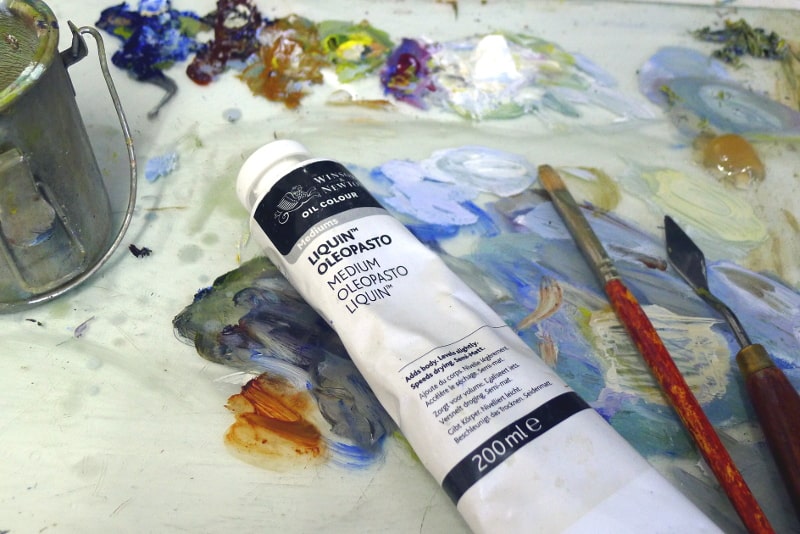
To paint over the repaired area I mix a little Liquin Oleopasto medium into the paint that I use. Liquin is a medium that artists can add to oil paint and is mainly used to speed up drying times in every day oil paining, Oleopasto is just a much thicker form of this medium and helps to fill in any indentations in the repaired area as I repaint.
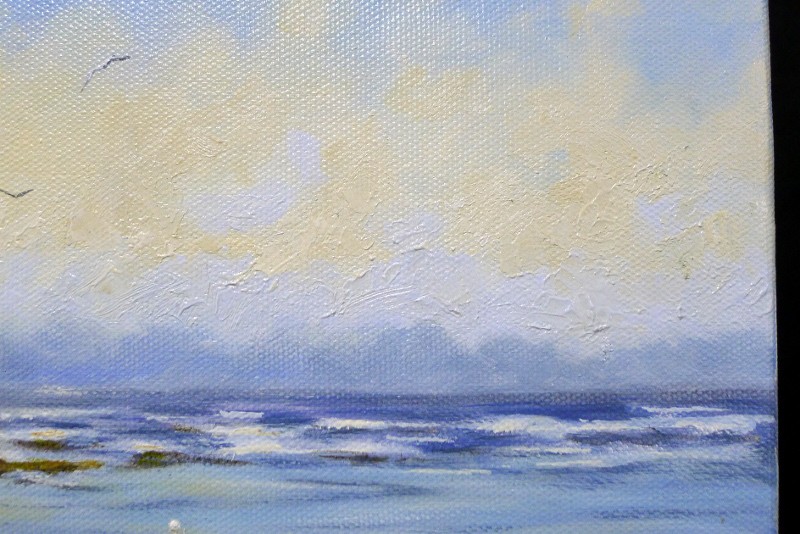
One of the keys to fixing a torn of ripped canvas like this is to re-paint more than just the area you’ve repaired, and when you do, the new brushwork should match that of the rest of the original painting. In my case some other parts of my original painting are painted with quite thick loose paint, namely the foreground wall and rocks, but some of the waves too, so I painted the repaired area in a similar style.
You can see I repainted right down to the horizon line, which I used as a handy natural break for my repainting.
For the process of repainting I used a palette knife to mix plenty of new paint/oleopasto mix, and put that paint on quite thickly and deliberately uneven using both a brush and a palette knife. If the paint looked too uneven I smoothed it out a little, if it looked too even I stippled it up with my brush. The idea is to match the existing original brushwork as best you can.

The final result is a permanent repair that will last as long as the rest of the painting, and one that is unnoticeable, unless you look at the back of the painting.
* read this post if you just want to get a dent out of a painting canvas.
If you have any questions get in touch.
Chris


You could use something like Daler Rowney Texture Paste, Liz. Really, the liquin medium is only there to aid levelling the canvas, you could just use think paint, but it’s easier with a medium added.
Hi Chris thanks for sharing this secret with the world.
Now will it be the same treatment to add more canvas to an existing paint? I have a painting that I would like to add more canvas to for I painted all the way to the edges and if I put stretchers to it the painted subject will go all the way to the edges and part of the head will be hidden on the top strecher. The canvas measures 6 by 4 feet.
Thank you chris
Hi Sergio, If, when wrapped around stretcher bars, the subject is too close to the canvas edge, I would suggest gluing the canvas to a piece of hardboard or MDF, then you can show/frame the whole painting without any being lost in the wrapping process. I do not think the method I described above would work for enlarging a canvas with new canvas strips, the additional canvas might not withstand the pressures involved when wrapped around stretcher bars. Hope that helps, Chris
Hello, I have a painting that had some water damage and the canvas became brittle fraying and torn around the edges of the canvas where the wood frame had contact. I need to repair edges and restretch it to a frame. Do you have any suggestions or resources to help me do that? Thanks
Hi Kim, it may be wise to remove the canvas from the stretcher and apply ( glue ) additional canvas on the back of the damaged edging, to strengthen/reinforce it. It would be better to fix new canvas to the back of the entire painting/canvas, and include the danged area. Then when re-stretched onto the stretcher the strain would no longer be on that damaged area.
Chris
I’ve just discovered your info on how to repair a tear in a large canvas.
I was getting ready to first sand the oil painted ripped canvas, then gesso then repaint.
I see you use some oleopasto liquin with no mention of sanding or gesso.
Do you prefer your method and why might it be better than what I just described: sanding, gesso, repaint?
It sounds much easier. I just want it to look like the original as I’ve had my photographer make CDs of it for entries. Thanks much!!
Hi Lynn, Sanding, gessoing and repainting will work just as well. I used oleopasto because I’d used it in the original painted area, before the damage, therefore to make the repair match I used it again. Hope your repair went well. Chris
Hi Chris~ Do you have any tips on acrylic peeling or being torn off? One of my paintings was unfortunately stored folded in half exposing dried acrylic to acrylic.The top and bottom of the painting stuck and there has been a lot of peeling/ sticking… I hope there is cure! I’m so upset.
Hi Kinsey, That’s a shame. Damage to acrylic like that is not repairable, but you can re-paint those areas damaged by the folding/sticking. Any acrylic still left on the painting that is flaking and coming away from the canvas/paper would need to be removed also, before repainting. It’s a pain, but I’m sure you can do it. Chris
Hi Chris, I have an original 1904 Harry Roseland oil painting. Sadly, it was damaged in a way very similar to the one pictured above however it is torn in two areas. Do you have any suggestions as to where or who I should take it to? What would you do if you don’t mind me asking?
Hi Crista, If your Harry Roseland painting is worth a considerable amount of money I would suggest NOT trying a repair yourself, but searching for ‘art conservators’ locally, failing that ask for referrals to good art conservators from a museum or organisations responsible for cultural material locally. If however the painting isn’t worth the cost of this, you could carry out a repair as detailed above, but bear in mind the paint will be old on your painting and very hard to match. Chris
Hi Chris,
Thanks for your info about the canvas repairs as I’ve just had an oil painting returned from a show with a hole in it! It has already been varnished so do I need to remove the varnish first before repainting using the liquin oleopasto and if so how would you recommend removing the varnish.
Hi Katen, It depends on what sort of varnish you used, if you used re-touching varnish you can paint over it, if you used a more permanent varnish you’d need to remove it first. You should be able to remove the old varnish with a rag dipped in turpentine, make sure you don’t remove any, or too much, of the painting though ~ Chris
Hi Chris, I have an acrylic painting that looks like it has some heat damage. The painting blistered/bubbled in some spots. Do you by chance know how I could fix it or if there is anyone who does that kind of work?
Hi Samantha, it sounds like the painting was not painted by yourself, in which case it would need to be re-painted over the damaged area by a competent artist. If the painting is varnished, that would need to be removed first, which can be done by rubbing off the varnish with a rag dipped in turpentine usually. Not knowing where you are, I would suggest googling ‘art restorers’ locally, or contacting your local museum and asking for art restorers detail, they usually used these services ~ Chris
Hi Chris
Thank you for the information. What are you thoughts on using beeswax instead of PVA, but then again would it be as stable as PVA? I have a small oil painting with a small tear, and I am quite nervous about repairing though I have done it before but a long time ago, I will just to take the bull by the horns. Thank you once again
Hi Gaynor, I’m not sure beeswax will work, I’ve not tried it, but I doubt it has the adhesive strength to cope with the stretch of the canvas. Let me know how you get on if indeed you do use it though ~ Chris
Hi Chris thank you for your reply. I am afraid I chose the PVA and it does look good, all I have to do now is to retouch the paintwork using your advice, but will probably be nowhere as good as yours. It is a small area only, so will take my time. Once again thank you.
You’re welcome Gaynor, and good work ~ Chris