With all the advanced camera equipment around today you’d think taking high quality photographs of your paintings would be an easy thing to do, in fact it’s more difficult than it first appears. The quality of your final image is going to be somewhat dependant on the quality of your camera equipment. However, you do not need to spend lots of money on expensive camera equipment if you bear the following things in mind when taking your photographs:
1) You want the sharpest image possible, that your camera will allow.
2) You want the largest image file size possible, that your camera will allow.
3) You want to avoid any unwanted light reflection or colour reflection cast across the painting you are photographing.
Camera
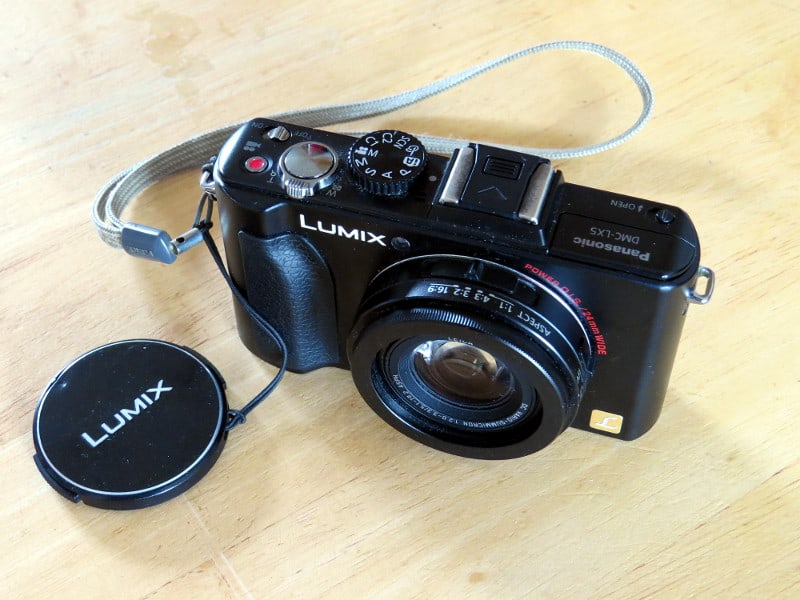
Panasonic Lumix DMC LX5.
The camera I use for my artwork photography is a Panasonic DMC-LX5, which is a high-end compact camera and costs about £400.
If you have a cheaper camera then this will mean it has cheaper hardware inside it, and as such it will generally take lower quality images, but don’t be put off too much if this is your situation. More important than the quality of your camera equipment is how you go about lighting your artwork for photography. I’ve tried many different cameras for photographing my paintings over the years, and my best results were always when I got the lighting just right.
1) Sharpest Image Possible
Natural light is best. Although indoor lighting seems nice and bright to our human eyes, to a ordinary camera’s sensor it’s hopeless. You can test this by taking a photograph indoors under artificial lighting in ‘auto mode’, and then looking at the shutter speed that photograph was taken in. Then take another photograph outside, even on a fairly dull day, and look again at the camera telemetry for shutter speed.
The shutter speed for the photograph taken outside will be much faster than that of the photograph taken inside. This matters A LOT if you’re holding your camera, because the faster the shutter speed the less impact shake will have on your image, the less shake, the sharper the resulting image.
The best way to find out which lighting condition works best for your camera, is to experiment. My Panasonic camera is highly sensitive, making taking photographs of my artwork outside unnecessary. In fact, sometimes outside is too bright even on an overcast day for good results. Your own camera might need different conditions, so try taking photos of your work:
A) Outside on a dull day.
B) Outside on a bright but overcast day.
C) Outside on a bright day.
D) Indoors in natural light.
E) Indoors under artificial light.
The worst kind of light for photographing paintings is usually under bright direct sunlight. When the sunlight is too harsh, it bounces back off of the whites in your painting, and will tend to overwhelm the camera sensor. You end up with washed out ( whited out ) areas in your photograph.
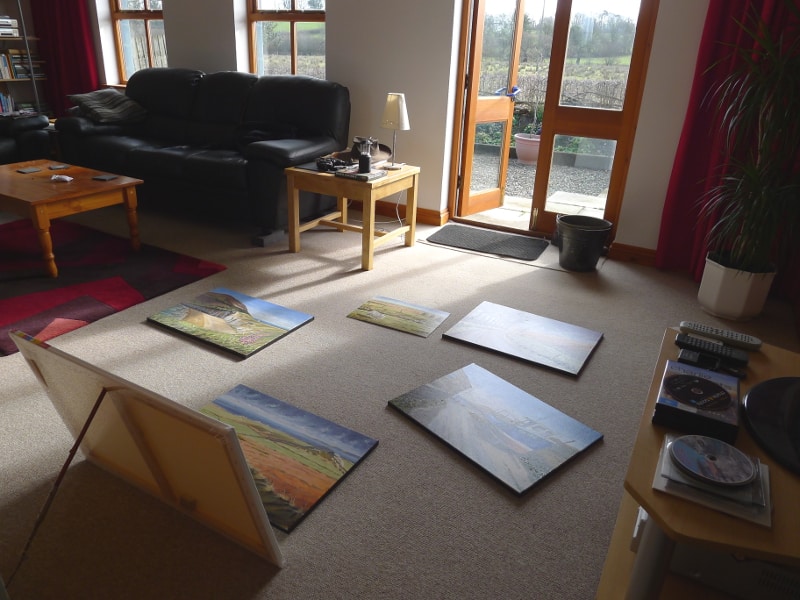
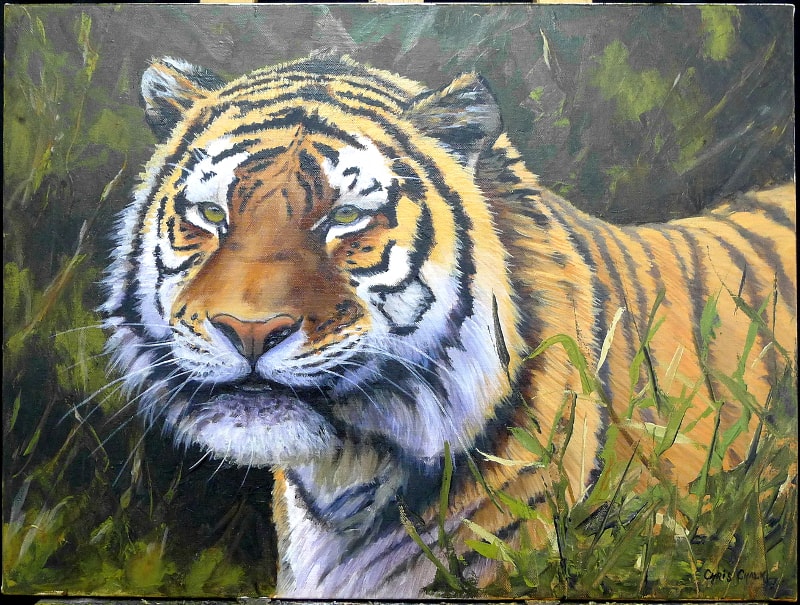
Photographing paintings, with blank canvas being used to reflect more natural light back and down into the painting.
I photograph all of my paintings in the manner you can see in the photograph above. The French windows face south. I place my paintings on the floor in front of these French windows, and depending on the time of day, which of course governs where the direct sunlight will be falling, I move the paintings left or right to keep them OUT of the direct sunlight.
At the bottom of this photograph you can see I use a blank white canvas, propped up at an angle, to reflect more light back and down onto the painting.
I stand behind the propped-up reflector canvas, and shoot looking directly down on top of the painting.
Through trial and error, I know that if there is enough light in the room to take the photograph at least 1/250 of a second shutter speed, it will be a sharp, clear, reflection free, high quality image.
2) Largest File Size Possible
Fill your viewfinder with the painting you are photographing, and use a little bit of zoom if you need, to achieve this. Not doing this, is a common mistake a lot of people make when photographing their work.
Remember, the more of your image you have to crop-off ( because it isn’t actually painting, but carpet, or wall, or whatever else was around you painting when you took the photo ), the smaller your final image file will be.
Badly filled view finder – lot of wasted mega pixels, just photographing what’s around the actual painting.
Correctly filled view finder – I’ve used nearly all of the camera’s mega pixels here photographing ACTUAL painting.
3) Avoid Reflections
Avoid reflections of any kind. It’s very easy to set your painting up perfectly, take a beautifully sharp photograph, and then when you look at your image on your computer you notice that there is a coloured reflection, or a light/dark stripe across your image. That is probably because there is a window, car, coloured wall, bucket.. e.t.c casting a reflection across your canvas and that you didn’t notice when you took the photograph. Look out for this, and relocate your painting, or the object causing the reflection.
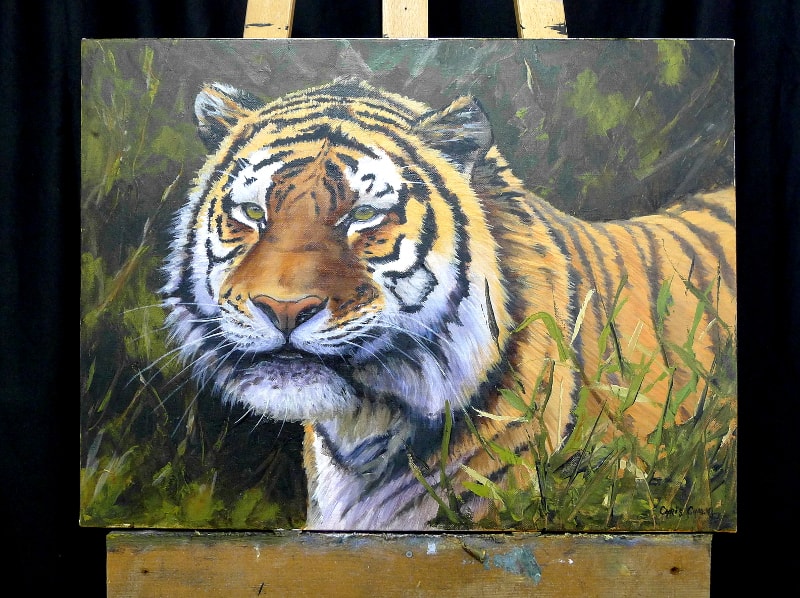
As a case in point, take another look at the tiger painting in the photograph above. You’ll notice that there is a glare across the top half of the painting which was caused by my daylight lamp in my studio. I took these photographs solely to help explain my point about filling the camera’s viewfinder, but happily it also explains the reflection problem we can face when taking photographs of our work. The glare wasn’t strictly caused by a reflection off of another surface, but in fact direct light coming from a very directional source, but it’s the same principle, you don’t want it and needs to be avoided.
Once you have the best possible image you can get using the methods above, the next step is to edit your image in image editing software to add the final touches, such as sharpening, altering the contrast and colour balance e.t.c.. to match the original painting.
Be aware that you can only work in image editing software with what you already have, and that even the very best image editing software will not be able to fix a poor blurry badly lit initial image.
4) Bonus Tip – Should I shoot in JPG vs RAW?!
(Updated:25/09/2020)
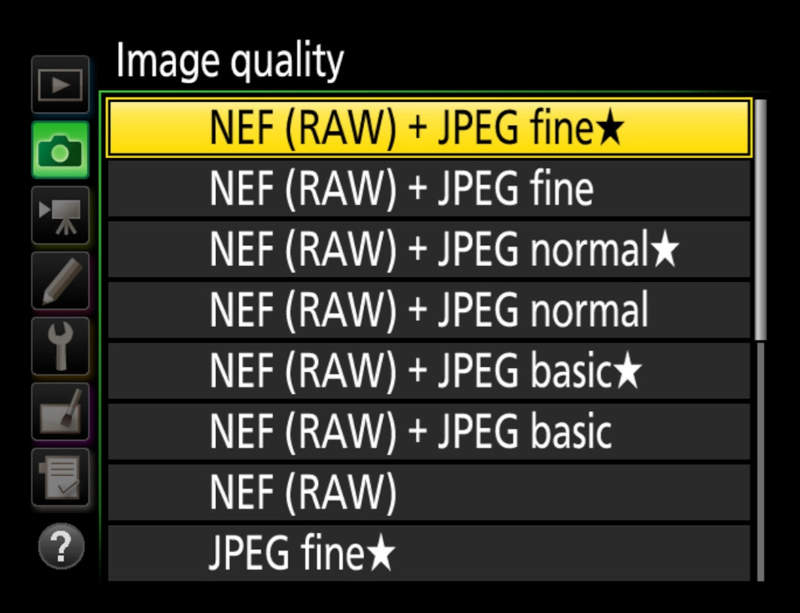
Which ever brand of camera you use, as with this Nikon menu chose JPF fine/best.
Lots of people have asked me whether I take photographs of my paintings in .JPG format, or .RAW format. I always use .JPG, and find that JPGs are sufficient for high quality images of artwork. It’s a fact that images taken in .RAW format are much larger files, and contain much more image data, and as such can be manipulated with image manipulation software to a higher degree without any degradation being introduced. However, if you are able to get the initial photograph of your painting reasonably close in colour/tone/contrast to the original painting, then any minor manipulation of that .JPG image isn’t going to degrade your image to a noticeable degree. Lots of modestly prices digital cameras don’t even have the capacity to shoot in .RAW format, don’t worry about it, shoot in .JPG and you’ll be fine.
NOTE: Once you’ve edited your .JPG image in your manipulation software of choice, ALWAYS save it as a .TIFF file on your computer.
Here’s Why:
JPEG uses lossy compression, meaning that some image data is lost when the file is compressed and saved. The amount of compression can be varied, the more compression the more data is discarded and the smaller a file becomes. JPEG is ideal for creating smaller file sizes for uploading on the Internet, or for use with e-mail.
TIFF format is the standard for most commercial and professional printing needs. Tiff files are a uncompressed format, meaning that no image data is lost when saving. TIFF files are very large in size compared to JPEGs because no compression is used.
If you enjoyed this post and found it useful, please share it.
Thanks ~ Chris

Hi
Great article , just tried it out and my photos are definitely better as there is no glare ( I normally photograph outside )
However the quality is still not what I would like , could this be my camera . I have a Fujifilm finepix s5800 ( 8m megapixel ) .
Thanks
John
Hi John, yes it could be your camera, the Fuji S5800 is quite basic. Before buying a new camera however, make your getting the best out of your Fuji. Try taking pictures on the ‘P’ setting (if you haven’t already), focus point in the middle of the painting, and with enough light to get a shutter speed of at least 250th of a second ~ Chris
Tank you for the great article, I’m definitely going to try your tips – I like the idea of using the blank canvas especially. My camera isn’t great but I’m sure this will help me get the best I can from it.
Glad it was helpful Fiona, get the lighting right and you’ll get super photos.
Hi Chris. Can I know a 2nd hand canera around £200 that can be use to take my own art work in high resolution for usb files and re print on larger canvas?
Hi Annis, You can get a Panasonic Lumix LX5 second-hand for under £200 now, I found these online https://www.amazon.co.uk/Panasonic-Lumix-10-1MP-Digital-Camera/dp/B003WOKUVK …but any of the newer Panasonic Lumix LX’s, like the LX10, are I expect as good, I have only used the LX5 however. It’s a really good camera for what you need ~ Chris
Hi Chris, thanks for a very helpful article, however you didn’t touch on the problem I always seem to get. When taking a photo I find it really difficult to get my camera square on to my painting, the sides either angle towards each other at the top (or bottom) or the whole thing is skewed. No matter how straight It looks in the viewfinder, the image is always off square. Any tips to help would be great. I use either my cheap elderly Fuji EXR on a tripod or in desperation my phone, both get the same crooked results. Thanks
Hi Bev, that is a common problem when photographing artwork. There is no real trick to getting the sides not to angle, other than by taking a few photos so that you can chose the best one. However, to avoid converging verticals, always use a little bit of zoom on your camera, even when quite close to the painting. Back away from the painting if needs be, so that you can use a little bit of zoom, this will correct converging verticals. You can of course correct misaligned sides in your photos using Photoshop/GIMP e.t.c quite easily, with no loss of image quality. GIMP is free image manipulation software https://www.gimp.org/ ~ Chris
Many thanks Chris, I will try your sugestion of a little zoom. In the past I have edited in Photoshop but just wondered if there was something I was doing wrong. Thanks again.
Hi Chris, thanks for getting back to me on twitter, I found this blog very interesting, I use a Nikon D3100 55m lens f5.6 appeture I usually take the photo outside whenever I can in sunshine but in the shade. Ive tried it on auto setting I’ve have a light meter so I also try it manually but no matter what I do I get an under exposed image which I have to process on my PC using Kodak Easyshare which is the only one I understand. I have gimp but dont know how to use it. Maybe everybody has to manipulate the image in some way or other and I am expecting too much from my camera.
Hi Kieth,
Taking your photos outside is not always best, it tends to produce a image which has a white glaze effect over it. Try taking your photos inside, on a bright day, in a well lit part of your floor, but not direct sun lite. You want you shutter speed to be at least 200th of a second, to counter any camera shake, whether using a tripod or not ( I don’t use a tripod ). You are right Kieth, all digital images need some manipulation in software, if your images are sharp and somewhere close to the correct colours, then you can usually correct them on your PC.
I use GIMP to sharpen, correct the colours, correct the contrast, of all of my images after taking them.
If you have a high res image of the painting you’re trying to correct Kieth, feel free to email it to me and I’ll have a quick play in GIMP and show you the results.
Chris
Thank you Chris, a really helpful and well described article, looking forward to your next piece
Ruth
You’re welcome, I’m glad you found it useful Ruth.